
Designing and building your own DIY platform bed with floating nightstands is more than just a weekend project it’s a chance to create a statement piece in your bedroom that perfectly fits your lifestyle. Instead of spending thousands on store-bought furniture, you can craft a modern platform bed that’s cost-effective, durable, and customized with smart features like under-bed storage, LED lighting, or even bedside charging outlets.
This comprehensive DIY bed tutorial will walk you through every step of building a wooden platform bed with floating nightstands, including optional storage solutions and lighting ideas. Whether you’re aiming for a lighted platform bed with an LED headboard or a sleek minimal design, you’ll find everything here to help you create a piece of DIY bedroom furniture that feels both modern and timeless.
Why Build a DIY Platform Bed With Floating Nightstands?

When you build instead of buy, you gain benefits that stretch far beyond saving money.
- Cost savings: Store-bought designer beds with integrated nightstands can easily cost $2,000–$4,000. A homemade platform bed plan can be built for $350–$600 depending on finishes.
- Customization: Choose your mattress size, platform height, storage type, and finishing style. Want a DIY king size platform bed with hidden drawers? You can do it.
- Durability: Solid wood and plywood construction outlasts particleboard frames. You’ll end up with a piece of furniture that can last decades.
- Space-saving design: Floating nightstands eliminate bulky side tables and make a small bedroom feel larger.
- Style flexibility: Match any bedroom theme—glossy black painted frame for modern minimalism, Danish oil wood finish for a natural aesthetic, or add under-mount lighting for headboard glow.
💡 Case Study: A Reddit user documented their DIY bed with storage and floating side tables for under $500, while a similar showroom model was priced at $2,800. That’s a 5x markup avoided with a weekend of work.
Tools and Supplies You’ll Need

Building a DIY platform bed isn’t complicated, but the right tools and supplies make all the difference.
Materials List

- Wood: ¾-inch plywood sheets, hardwood planks (oak, maple, birch for premium, pine for budget).
- Support: 2×4 or 2×6 lumber for frame reinforcement.
- Fasteners: 3-inch wood screws, pocket hole screws, brackets, and wood glue.
- Hardware: Drawer slides (if adding under-bed drawers), concealed brackets for floating nightstand storage.
- Finishes: Danish oil wood finish, polyurethane finish for wood, or paint.
- Optional: LED strip lights, LED puck lights for bed, power strips with USB charging outlets.
Tools List
- Circular saw or table saw.
- Drill/driver and drill bits.
- Orbital sander or sanding block.
- Pocket hole jig (for hidden joints).
- Tape measure, speed square, level.
- Clamps for stability during assembly.
Measuring and Planning Your Bed Frame

Before you cut a single board, planning is essential.
- Mattress Size: Measure your mattress and add at least ½ inch clearance on all sides. Common mattress dimensions:
| Mattress Size | Dimensions (inches) | Recommended Bed Frame Size |
|---|---|---|
| Twin | 38 x 75 | 39 x 76 |
| Full | 54 x 75 | 55 x 76 |
| Queen | 60 x 80 | 61 x 81 |
| King | 76 x 80 | 77 x 81 |
| Cal King | 72 x 84 | 73 x 85 |
- Platform Height: Standard is 12–14 inches, but you can raise it to 16–18 inches for a DIY bed with storage.
- Support System: Decide between a solid plywood top or mattress support slats for ventilation.
- Nightstand Integration: Sketch placement of floating bedside table designs so proportions look balanced with the bed frame.
📐 Tip: Sketch your layout to scale on graph paper or use free 3D design tools like SketchUp.
Building the Platform Base
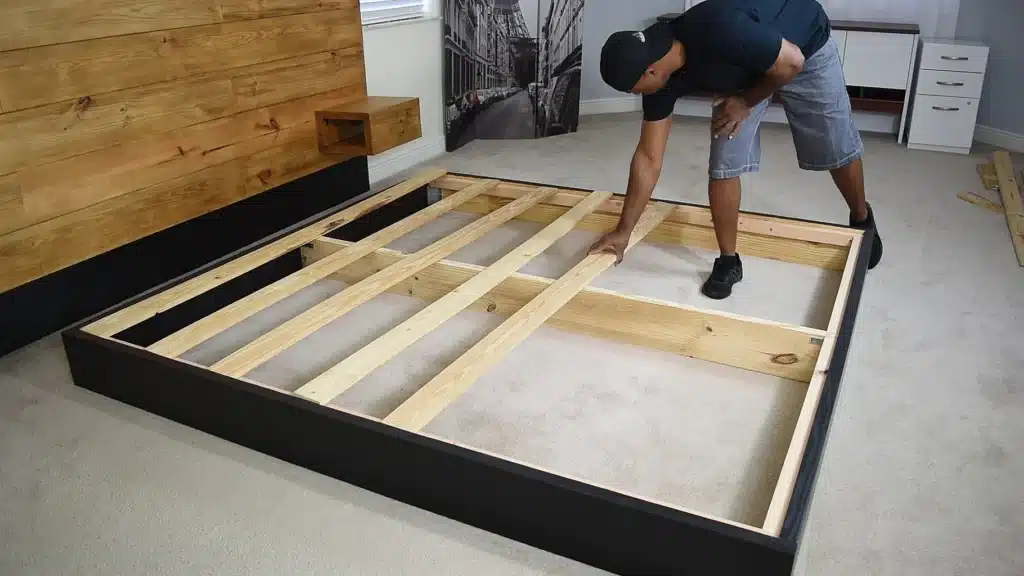
This is the backbone of your DIY bed frame construction.
- Cut the Frame: Rip your plywood sheets to size. Use hardwood for exposed edges.
- Assemble Outer Frame: Join pieces with wood glue and screws. Reinforce corners with metal brackets for added strength.
- Add Support Slats: Space mattress support slats 3 inches apart for foam mattresses, 4 inches for spring mattresses.
- Center Beam: For larger beds, add a center support beam to prevent sagging.
- Dry Fit Test: Place the mattress on the frame before final sanding or finishing.
⚒️ Pro Tip: If you’re aiming for a sleek minimal bed frame, hide screws using pocket holes or wood plugs.
Adding Storage Options

A DIY bed with storage maximizes every inch of your bedroom. Depending on skill and tools, you have options:
- Under-bed drawers: Install drawer slides on both sides for clothing or bedding storage.
- Lift-up storage: Use gas struts or hinges to lift the entire mattress platform.
- Open cubbies: Easy to build and perfect for baskets or shoes.
| Storage Type | Difficulty | Pros | Cons |
|---|---|---|---|
| Drawers | Medium | Hidden, organized storage | Requires precise carpentry |
| Lift-up platform | Hard | Huge storage capacity | Costly hardware, heavy lifting |
| Cubbies | Easy | Inexpensive, quick to build | Open look, dust accumulation |
Constructing and Mounting Floating Nightstands

A true platform bed with floating nightstands adds both functionality and style.
Building Floating Nightstands

- Cut panels: Use ¾-inch plywood or hardwood.
- Design choices:
- Drawer-style for hidden storage.
- Open-shelf for books and decor.
- Floating nightstand storage with built-in wireless chargers.
- Joinery: Pocket hole screws or biscuit joints keep it clean.
Mounting Floating Nightstands

- Use concealed floating shelf brackets for strength.
- Ensure they’re flush with the bed frame for seamless integration.
- Standard height: 24 inches from the floor (align with mattress top).
🔌 Upgrade: Add bedside charging outlets or recessed USB hubs for modern convenience.
Finishing Touches

Now it’s time to make your DIY bedroom furniture shine.
- Sanding: Start with 120-grit, finish with 220-grit for smoothness.
- Stain or Oil: Use Danish oil wood finish for a natural, deep tone.
- Seal: Apply polyurethane finish for wood for durability and a slight sheen.
- Paint Option: A glossy black painted frame creates a bold, modern statement.
- Lighting: Install LED strip lights under the bed or behind the headboard for a lighted platform bed.
✨ Style Tip: A custom headboard with lights creates a boutique-hotel feel without the hotel bill.
Safety and Durability Tips

Don’t skip on stability—it makes or breaks your project.
- Anchor points: Check every joint for wobble. Use clamps during assembly.
- Weight capacity: A well-built wooden platform bed supports 600–900 lbs.
- Wall clearance: Leave at least 2 inches behind the bed for airflow and cords.
- Wood choice: Hardwoods like oak or maple last longer than pine.
Estimated Cost and Time Breakdown

Here’s a real-world breakdown for a DIY king size platform bed with floating nightstands:
| Component | Cost Estimate |
|---|---|
| Lumber & plywood | $180–$220 |
| Hardware & fasteners | $60–$80 |
| Finishes (oil, paint, sealant) | $40–$70 |
| Lighting & outlets (optional) | $50–$120 |
| Drawer slides (optional) | $40–$80 |
Total: $350–$550 (vs. $2,000+ retail)
Time: 2–3 days for basic build, 4–5 days with storage + finishes.
Real-Life Inspiration

“Building my own modern platform bed with floating nightstands was the best weekend project I’ve ever done. It saved me $1,700 compared to retail, and every time I walk into my bedroom, it feels like a custom designer space.” – DIY enthusiast testimonial from Houzz forum
Another example is Pinterest boards showing wooden headboard DIY builds paired with LED puck lights for bed, transforming plain rooms into modern bedroom makeovers without breaking the bank.
Conclusion
A DIY platform bed with floating nightstands isn’t just a project it ’s an investment in comfort, style, and savings. From floating bedside table designs to under-mount lighting for headboard effects, this DIY bed tutorial helps you bring luxury into your space without draining your wallet.
Whether you choose a DIY bed with storage, a sleek minimal bed frame, or a full LED headboard bed, you’re creating something uniquely yours. With the right materials, careful planning, and a weekend of dedication, you’ll have a cost-effective bedroom upgrade that rivals showroom pieces and lasts for years.
So roll up your sleeves, grab your tools, and get ready to build your own bed frame that combines function, elegance, and a touch of DIY pride.
